Modern text rendering with Linux: Antialiasing
Introduction
Welcome to part 2 of Modern text rendering in Linux. Check out the other posts in the series: part 1 and Overview.
In this post I will show how to render a glyph to an image and the differences between grayscale and LCD (subpixel) antialiasing.
Setup
I will use the same code, OS, compiler and libraries used in part 1 and extend the code.
This will be our final result. And here is the code.


Let’s start right back from where we stopped last time:
$ clang -I/usr/include/freetype2 \
        -I/usr/include/libpng16  \
        -Wall -Werror            \
        -o main                  \
        -lfreetype               \
         main.c && ./main
FreeType's version is 2.8.1
   .*****.
  .********.
  .*********
   .     ***.
          ***
          ***
    .********
  ***********
 .**.     ***
 ***      ***
 ***      ***
 ***.     ***
 .***********
  ***********
   .*******..
Including stb_image_write
To render a glyph to a JPG image we will use nothing’s stb_image_write.
In the same folder as main.c run:
$ wget https://raw.githubusercontent.com/nothings/stb/master/stb_image_write.h
If wget is not installed run sudo apt install wget to install it
and then retry the previous command.
In main.c add the library to the includes.
 #include <freetype2/ft2build.h>
 #include FT_FREETYPE_H
+
+ #define STB_IMAGE_WRITE_IMPLEMENTATION
+ #include "./stb_image_write.h"
+
 int main() {
Rendering a Grayscale Antialiased Glyph
First of all extract face->glyph->bitmap to a variable to make the
code tidier.
+  FT_Bitmap bitmap = face->glyph->bitmap;
-  for (size_t i = 0; i < face->glyph->bitmap.rows; i++) {
-   for (size_t j = 0; j < face->glyph->bitmap.width; j++) {
-     unsigned char pixel_brightness =
-         face->glyph->bitmap.buffer[i * face->glyph->bitmap.pitch + j];
+  for (size_t i = 0; i < bitmap.rows; i++) {
+    for (size_t j = 0; j < bitmap.width; j++) {
+      unsigned char pixel_brightness = bitmap.buffer[i * bitmap.pitch + j];

     if (pixel_brightness > 169) {
       printf("*");
     } else if (pixel_brightness > 84) {
       printf(".");
     } else {
       printf(" ");
     }
   }
   printf("\n");
 }
Create a buffer for the image data (remember to free it at the end).
  FT_Bitmap bitmap = face->glyph->bitmap;
+
+ unsigned char* data =
+     malloc(bitmap.width * bitmap.rows * sizeof(unsigned char*));
+
  for (size_t i = 0; i < bitmap.rows; i++) {
Delete the printing instructions and copy the pixel data into the buffer.
  for (size_t i = 0; i < bitmap.rows; i++) {
    for (size_t j = 0; j < bitmap.width; j++) {
-     unsigned char pixel_brightness = bitmap.buffer[i * bitmap.pitch + j];
+     data[i * bitmap.width + j] = bitmap.buffer[i * bitmap.pitch + j];
+
-     if (pixel_brightness > 169) {
-       printf("*");
-     } else if (pixel_brightness > 84) {
-       printf(".");
-     } else {
-       printf(" ");
-     }
    }
-   printf("\n");
  }
Finally, write the image to a JPG file called image.jpg.
  }
+
+ stbi_write_jpg("image.jpg", bitmap.width, bitmap.rows, 1, data, 100);
+
  return 0;
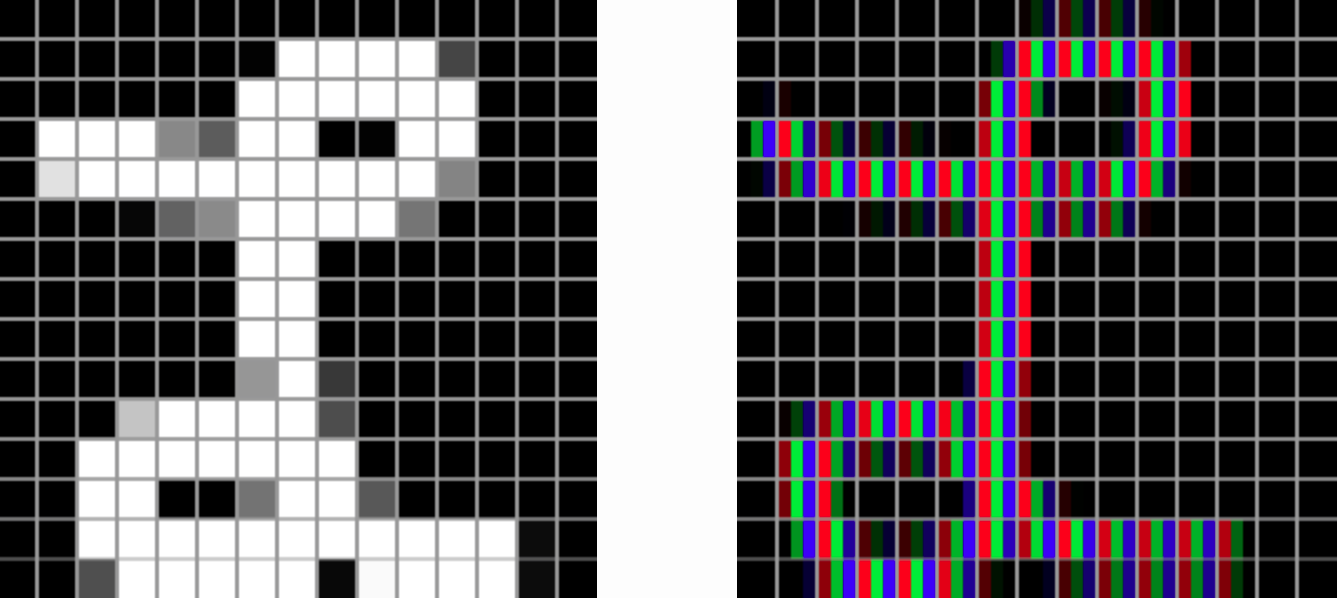
image.jpg should look like this.
Rendering a LCD (Subpixel) Antialiased Glyph
Changing the antialiasing technique is easy with FreeType.
Add this header to include the LCD filtering functionality.
  #include FT_FREETYPE_H
+ #include FT_LCD_FILTER_H

  #define STB_IMAGE_WRITE_IMPLEMENTATION
Set which LCD filter to use. For a list of filters check the FreeType docs on Subpixel Rendering. We will use the default one.
  FT_Int major, minor, patch;
  FT_Library_Version(ft, &major, &minor, &patch);
  printf("FreeType's version is %d.%d.%d\n", major, minor, patch);
+
+  FT_Library_SetLcdFilter(ft, FT_LCD_FILTER_DEFAULT);
+
  FT_Face face;
Change the render mode to LCD. Here is a list of the available render modes.
- FT_Int32 render_flags = FT_RENDER_MODE_NORMAL;
+ FT_Int32 render_flags = FT_RENDER_MODE_LCD;
image.jpg should look like this.

What happened? LCD Antialiasing works by treating each pixel as three separate light sources, each one capable of emitting either Red, Green, or Blue light. Grayscale Antialiasing instead treats each pixel as a single light source, emitting white light.
We will explain how this works in detail later, but for now what we care about is that LCD AA triples the horizontal resolution of the image.
Let’s change the code so that we see a colored image where each pixel is composed of three channels: R,G,B.
- stbi_write_jpg("image.jpg", bitmap.width, bitmap.rows, 1, data, 100);
+ stbi_write_jpg("image.jpg", bitmap.width / 3, bitmap.rows, 3, data, 100);
image.jpg should look like this.
You can find the complete code here.
How do they work?
Draw on the grids, then click sample to see how the different antialiasing tecniques work. Try drawing the same shape in both, for example an ‘A’, and then compare the results.
Grayscale
LCD
What you should be seeing after drawing and clicking sample.
Grayscale Antialiasing
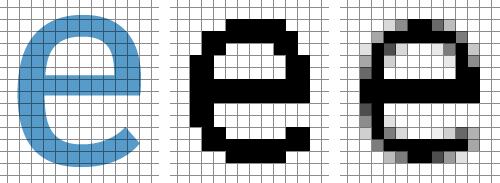
Image taken from Smashing Magazine
Grayscale Antialiasing divides the image to render in a grid, then, for each square in the grid, counts how much the area of a grid’s square is covered by the image. If 100% of the square is covered then the pixel will have 100% opacity, if 50% of the square is covered then the pixel will be half-transparent.
LCD (Subpixel) Antialiasing
Image taken from Smashing Magazine
LCD Antialiasing exploits the fact that each pixel is made of three independent light sources, usually thin rectangles, which we call subpixels. By knowing the order (Red Green Blue or Blue Green Red) in which these subpixels form a pixel, we can turn them on individually to triple the horizontal resolution.
The main downside of this method is that when rendering an image, you need to know the order in which subpixels are placed on the screen, which may not be available. Also think of a phone screen being rotated 90 degrees, the images need to be re-rendered (or at least re-antialiased) because the subpixels are now one on top of the other instead of side by side. This is the reason why iOS doesn’t use subpixel rendering while macOS pre 10.14 does.
Sources
- A closer look at font rendering by Smashing Magazine
- Sub-pixel, gamma correct, font rendering by Puredev Software
- Font Rasterization by The AGG Project